


Introduction
Do you ever break into a sweat when squeezing into a tight parking space, or hold your breath as you edge backward, fretting over unseen obstacles? You’re not alone gauging distances in confined spots is a challenge for drivers of all skill levels, and even a small miscalculation can lead to costly dents or scrapes.
Fortunately, parking sensors offer a simple, effective solution to take the guesswork and the stress out of parking. These devices use cutting-edge detection technology to alert you to objects lurking in your blind zones, turning nail-biting manners into smooth, confident pulls into any space.
In this ultimate guide to parking sensors, we’ll walk you through everything you need to know about parking sensors. You’ll discover how these systems bolster safety, the variety of sensor types on the market, and the key features to look for when selecting a model that’s right for your vehicle. By the end of this article, you’ll be equipped to choose and install the perfect parking-aid system, ensuring every parking attempt is as effortless as it is secure.
What are Parking Sensors?
Definition:
Parking sensors are small proximity sensors often housed in discreet, waterproof casings mounted on your vehicle’s front and/or rear bumpers. They act as your “extra set of eyes,” tracking how close your car is to surrounding objects that might otherwise go unnoticed when you’re maneuvering at low speeds.
Basic Function:
These systems work by emitting either ultrasonic sound waves or electromagnetic fields. When these waves or fields hit an obstacle, they bounce back to the sensor. The onboard control unit measures the time it takes for the return signal and calculates the exact distance between your car and the obstacle. As you approach, the system typically alerts you with a series of beeps that grow more rapid or with a visual display indicating remaining clearance so you always know exactly when to stop.
Purpose:
Designed primarily for low-speed situations like parking lots, garage entries, and tight city streets, parking sensors eliminate much of the guesswork involved in judging clearances. By providing real-time feedback on nearby objects whether it’s a low curb, a shopping cart, or a curious passerby these systems help you avoid minor dings, costly repairs, and the stress that often accompanies close-quarters parking.
Key Benefits of Using Parking Sensors
1. Addressing Common Parking Challenges with Parking Sensors for Car
Many drivers struggle with spatial awareness in tight spots or busy lots. Parking sensors for car act as an intuitive guide, alerting you to obstacles that are hard to see from the driver’s seat. Whether you’re navigating a narrow garage or parallel parking on a crowded street, these proximity aids remove much of the uncertainty from low-speed maneuvers.
2. Reduced Stress & Increased Confidence with Wireless Parking Sensors
Traditional parking often relies on guesswork judging distances by eye or instinct alone. Wireless parking sensors transform that process into a series of clear, audible beeps (or brief visual cues), so you know exactly how close you are to an object. This real-time feedback alleviates parking anxiety and empowers even novice drivers to approach tight spaces with poise and precision.
3. Preventing Damage with Rear Bumper Sensors
Fear of scratching or denting your bumpers is all too common, especially when backing out of crowded driveways or tight parking stalls. Rear bumper sensors detect obstacles even low curbs or stray shopping carts that would otherwise remain unseen until it’s too late. By warning you before contact occurs, these reversing sensors wireless or wired kits help you avoid costly repair bills and the frustration of body-shop visits.
4. Improved Safety with Forward Parking Sensors
It’s not just about bumpers forward parking sensors guard against collisions with pedestrians, children, or pets that might dart in front of your vehicle. Forward parking sensors continuously scan your path at low speeds, alerting you if someone steps into your blind zone. This added layer of protection offers peace of mind when pulling into driveways, crowded event venues, or bustling urban streets.
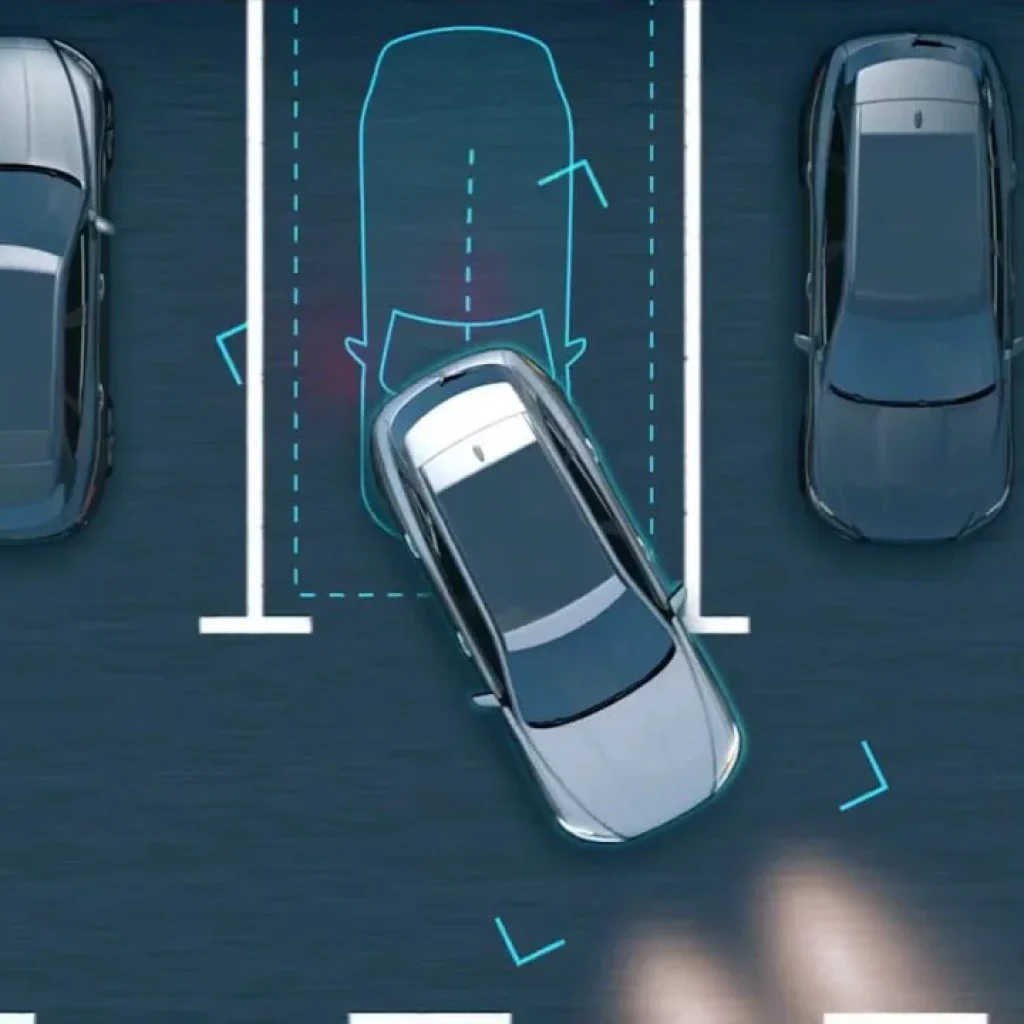
5. Easier Parking in Tight Spots with Parking Reversing Sensors
Precision is key when squeezing into especially tight spots. Parking reversing sensors break down remaining distance into clear, incremental alerts, so you stop exactly when you need to no more inches to spare or awkward “inch-by-inch” adjustments. Whether you choose an OEM-style parktronic sensor or an aftermarket kit, you’ll find that crowded garages and parallel spaces suddenly feel far less daunting.
6. Adding Modern Features via CAN Bus System Integration
For owners of older vehicles, integrating a CAN bus system–compatible parking sensor kit adds a sleek, factory-like touch. These “smart” sensors communicate directly with your car’s onboard network, offering diagnostics, silent operation, and seamless alerts through existing dashboard displays perfect for upgrading your ride with minimal visual clutter.
7. Maintaining Resale Value by Preventing Damage
A vehicle free of dents and scratches holds its value better on the resale market. By catching potential impacts before they happen, parking sensors preserve your car’s exterior finish and structural integrity helping you command a higher price when it’s time to sell or trade in. Investing in a quality sensor system today can pay dividends in your car’s long-term worth.
Together, these benefits show how installing front, rear, or 360° parking sensors can transform the parking experience making it safer, less stressful, and ultimately more rewarding for every driver.
Types of Parking Sensor Systems
When choosing a parking sensor system, the first decision is selecting between the two main technologies: ultrasonic and electromagnetic. Each offers distinct advantages and trade-offs in performance, aesthetics, and installation. Below is a comparison to help you decide which type best suits your vehicle and parking needs.
| Sensor Type | Technology | How it Works | Pros | Cons | Installation Type |
| Ultrasonic | Sound Waves | Emits high-frequency sound waves and measures the time for echoes to return. |
Widely available and cost-effective Reliable detection of most objects Wider detection cones for better coverage |
Sensors are visible on the bumper Performance can degrade if sensors get dirty or covered in snow May fail to detect very thin objects (e.g., poles) |
Requires drilling precise holes in the bumper for each sensor |
| Electromagnetic | Electromagnetic Field | Generates a low-power electromagnetic field around the bumper; detects disturbances when objects enter the field. |
Completely hidden behind the bumper for a seamless look Unaffected by dirt, mud, or light snow Low maintenance |
Typically shorter detection range than ultrasonic Detection zone size may be fixed and non-adjustable Nearby large metal objects can trigger false alerts |
Adheres to the inner surface of the bumper—no drilling needed |
Key Takeaways:
- Ultrasonic sensors are the most common choice, offering robust, all-around proximity detection at an affordable price but they require visible sensor heads and periodic cleaning.
- Electromagnetic sensors suit drivers seeking a factory-style, “invisible” solution that resists weather and debris, though they generally have a more limited detection envelope and higher cost.
In the next section, we’ll explore additional variations such as camera-integrated systems and full 360° packages and guide you through selecting the right configuration for your driving environment and budget for parking sensors system.
How Parking Sensors Work (Simplified)
Parking sensors take complex detection processes and turn them into intuitive alerts that anyone can understand. Here’s a non-technical look at how each technology “sees” obstacles and warns you in real time.
Ultrasonic Sensors: Ping and Echo
- Ping: Each sensor emits a brief, high-frequency sound pulse inaudible to human ears toward whatever lies in front of it.
- Echo: When that pulse hits an object (like a curb or wall), it bounces back to the sensor.
- Timing = Distance: The sensor’s control unit measures how long it took for the ping to return. Because sound travels at a known speed, the system instantly calculates how far away the obstacle is.
- Alert: As you get closer, the beeps grow faster (or the visual indicator bar fills up), telling you exactly when to stop.
Electromagnetic Sensors: Invisible Field
- Field Generation: Instead of sound, these sensors create a low-power electromagnetic field that extends a few feet around your bumper.
- Disturbance Detection: When any object enters that field even something as thin as a pole the field’s signature changes.
- Signal Change = Obstacle: The sensor picks up this disturbance and sends a signal back to the control unit.
- Alert: You receive the same kind of audible or visual warning, calibrated to how deep into the field the object has penetrated.
Joyzan Electromagnetic Parking Sensor, Universal Car Sensor Kit Built in Reversing Alarm Assistance Full Range Rear Induction
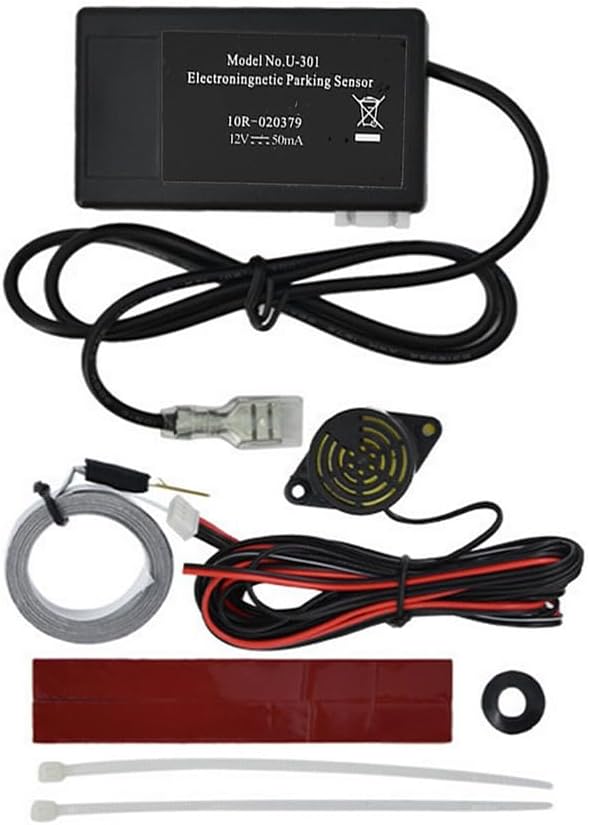
Features:
- Brand: Joyzan
- Enhanced Parking Safety: Accurate obstacle detection with intuitive beep alerts.
- Universal Fit: Works seamlessly with cars, SUVs, trucks, RVs, and minivans.
- Easy Installation: Concealed, hassle-free setup with low maintenance.
Upgrade your driving confidence with our reversing alarm parking sensor system, designed to minimize bumper damage and enhance parking safety. Featuring electromagnetic induction technology, it offers precise distance measurement and intuitive obstacle alerts, helping you navigate tight spots with ease. Universally compatible across all vehicle types, this backup radar integrates seamlessly with your car’s exterior, ensuring both protection and style.
From Detection to Driver Feedback
- Data Processing: Regardless of the sensor type, the control module continuously analyzes incoming signals (echo timings or field disturbances).
- Distance Mapping: It translates that raw data into clear distance zones often shown as colored bars on a screen or via progressively faster beeps.
- Real-Time Guidance: You hear a series of beeps (slow to fast) or see a graphical display that tells you exactly how much clearance remains, so you can park confidently without guesswork.
By converting echoes or field disruptions into simple pulses or on-screen cues, parking sensors let you focus on steering while they handle the tricky business of measuring space.
Parking Sensor Buying Guide: What to Consider
Selecting the right parking sensor system involves weighing multiple factors from your driving habits to vehicle-specific quirks. Below is an expert-driven checklist to guide to parking sensors related to your evaluation and ensure you choose a solution that fits your needs, budget, and installation preferences.
1. Coverage Configuration: Front, Rear, or Both
- Rear Only: Ideal for drivers who primarily worry about backing into obstacles. More affordable, simpler install.
- Front Only: Helps with tight forward maneuvers (e.g., parking garages). Less common, but useful in cities with narrow streets.
- Front & Rear: Provides full-circle protection recommended for SUVs, vans, and anyone who parks in confined spaces both forward and backward.
Expert Tip: If you frequently navigate multi-story car parks or parallel‐park in busy urban areas, a dual-end setup delivers maximum peace of mind.
2. Number of Sensors
- Two per Bumper: Covers the central zone but may leave gaps at the corners.
- Four per Bumper (or More): Offers broader detection cones and minimizes blind spots especially important on wider vehicles like trucks or vans.
Evaluation Insight: More sensors translate to finer-grained distance data and fewer “dead zones,” reducing the chance of unseen scrapes.
3. Display & Alert Types
- Audible Only: Simple beeps or tone patterns straightforward and cost-effective.
- LED Display: Color-coded bars (green, yellow, red) offer quick visual cues of proximity.
- LCD Display: Digital readouts show exact distances (e.g., “0.6 m”) and may integrate with your infotainment screen.
- Infotainment Integration: High-end kits can route alerts through your car’s existing display seamless and uncluttered.
E-E-A-T Note: Drivers who value precision tend to prefer LCD or integrated systems, as they reduce guesswork in judgment calls.
4. Wired vs. Wireless Systems
- Wired Parking Sensors: Reliable signal transmission; ideal for permanent, professional installations. Requires routing cables behind bumpers and interior panels.
- Wireless Parking Sensors: Easier DIY installation with minimal drilling; modules communicate via radio frequency. May be prone to interference in extreme conditions.
Evaluation Expertise: If you’re comfortable with basic vehicle wiring, wired sensors deliver the most consistent performance but wireless kits shine for quick retrofits.
5. Advanced Features to Look For
- Angle Detection / Adjustability: Some sensors let you tweak their detection cone to suit slanted bumpers or aftermarket body kits.
- Weather Resistance (IP Rating): Ensure sensors are rated at least IP67 protected against dust ingress and powerful water jets.
- Self-Testing & Diagnostics: Built-in routines that check sensor health on startup and alert you to faults.
- Sensitivity Adjustment: Ability to fine-tune how “close” an object must be before triggering helpful in high-traffic areas to avoid constant beeping.
6. Vehicle-Specific Considerations
- SUVs, Vans & Trucks: Higher bumper profiles may require sensors with longer maximum range. Consider adding extra units at the corners for full coverage.
- Tow Bars & Rear‐Mounted Spare Wheels: Position sensors above or beside these fixtures to prevent false alerts. Some kits include specialized bracket mounts for tow-bar applications.
- Compatibility with Electrical System: Verify the kit’s voltage requirements and connector types match your car’s battery and wiring harness.
Expert Tip: When in doubt, consult your vehicle’s service manual or an experienced installer to map out optimal sensor locations and wiring routes.
By systematically evaluating each criterion coverage, sensor count, alert style, installation method, advanced options, and vehicle particulars you’ll be equipped to choose a parking sensor system that transforms every parking maneuver into a smooth, stress-free experience.
Installation: DIY vs. Professional
When it comes to fitting parking sensors, you have two routes: tackle the job yourself or enlist a professional. Here’s an honest look at what each option involves and how the costs compare so you can make the best choice for your skills, budget, and peace of mind.
Complexity Overview
Installing ultrasonic sensors typically requires drilling precise holes in your bumper and routing low-voltage wiring through the vehicle body. Electromagnetic systems avoid drilling but still demand careful mounting behind the bumper and secure attachment of the control module. Both setups call for patience, attention to detail, and a basic understanding of automotive wiring.
DIY Installation
What It Involves:
- Drilling & Mounting: Mark and drill holes to accommodate sensor heads (for ultrasonic kits). Secure each sensor flush with the bumper surface.
- Wiring: Run sensor wires through grommets or drilled holes, route cabling to the control box (often tucked behind the trim), and connect to your car’s reverse-light circuit and power source.
- Display/Alerts: Mount the control unit and install the speaker or display unit inside the cabin typically on the dash or rear-view mirror.
Required Tools & Skills:
- Drill with hole-saw bits sized to your sensor heads
- Wire strippers/crimpers, electrical tape, zip-ties
- Multimeter for voltage checks
- Basic automotive wiring knowledge and trim-panel removal
Potential Pitfalls:
- Incorrect Placement: Sensors set too high, low, or at odd angles can create blind spots or false alerts.
- Wiring Errors: Miswiring to the wrong circuit can lead to non-functioning sensors or blown fuses.
- Cosmetic Damage: Sloppy drilling or bumper scratches may require paint touch-ups.
Professional Installation
Benefits:
- Expertise & Accuracy: Technicians ensure optimal sensor placement and angle for maximum coverage.
- Clean Finish: Wires are hidden and trim panels re-installed properly, preserving factory aesthetics.
- Warranty & Support: Many shops offer a guarantee on both parts and labor.
Types of Installers:
- General auto garages
- Car-audio or vehicle-accessory specialists
- Dealership service centers (especially for OEM integrations)
Estimated Costs:
- Labor Rates: £80–£150 per hour, depending on region and shop reputation.
- Typical Install Time: 1–3 hours, depending on system complexity (front & rear vs. rear-only).
Cost Breakdown Comparison
| Installation Type | Kit Cost (Sensor System) | Labor Cost* | Total Estimated Cost | Pros | Cons |
| DIY | £40–£120 | £0 (own time/tools) | £40–£120 | Lowest out-of-pocket spend; learn new skills | Time-intensive; risk of errors; no warranty |
| Professional | £40–£120 | £80–£450 | £120–£570 | Fast, accurate, warranty included | Higher cost; need to schedule shop time |
*Labor cost assumes 1–3 hours at £80–£150/hour.
By weighing your comfort level with drills and wiring against your desire for a flawless, warranty-backed installation, you can decide whether a hands-on DIY approach or a professional fitment better suits your needs.
Parking Sensor Buyer’s Checklist
- Required Element: Parking Sensor Buyer’s Checklist table generation based on tableInstructions.
| Consideration | Check (Y/N) | Notes |
| Do I need front, rear, or both? | Consider your typical parking scenarios (parallel parking vs. nose-in stalls vs. backing up). | |
| How many sensors are needed for my vehicle size? | More sensors provide broader coverage—especially important on wider vehicles like SUVs or trucks. | |
| What type of display is preferred (audible, LED, LCD)? | Visual displays (LED/LCD) offer precise distance feedback; audible-only is simpler and more affordable. | |
| Is wireless or wired installation better for me? | Wired systems are more reliable but require routing cables; wireless kits are easier DIY installs. | |
| Are there specific features I need (e.g., angle adjust)? | Angle-adjustable sensors suit slanted bumpers; sensitivity control helps in high-traffic areas. | |
| Is the system weather-resistant? | Look for at least an IP67 rating to ensure protection against dust and heavy rain or snow. | |
| What is my budget for the system and installation? | Factor in both the kit cost and potential professional labor if you’re not installing DIY. | |
| Is the system compatible with my vehicle? | Verify voltage requirements, connector types, and any needed integration with existing electronics. | |
| Are there options for vehicles with tow bars/spares? | Check that sensors can be placed around tow bars or spare wheels to prevent false alerts. | |
| What is the warranty and return policy? | Ensure the manufacturer offers a solid warranty and a clear return policy on aftermarket electronics. |
Tips for Using Your Parking Sensors Effectively
- Understand the Alert Cadence
- What You’ll Hear/See: Slow beeps indicate a safe distance; the beeps accelerate as you get closer, and a continuous tone means you’re at the minimum safe clearance. Visual displays often change from green to yellow to red in lockstep with the beeps.
- Expert Tip: Pay close attention to the transition points in the alert sequence they’re calibrated to give you enough reaction time before contact.
- Keep Sensors Clean
- Why It Matters: Dirt, mud, ice, or snow on sensor lenses can muffle sound waves or distort the electromagnetic field, leading to missed obstacles or false alarms.
- Expert Tip: After driving in wet or wintry conditions, wipe each sensor gently with a soft cloth no harsh chemicals to maintain peak performance.
- Know Your Sensors’ Blind Spots
- Potential Misses: Very thin objects (like signposts or bike spokes), absorbent materials (thick rubber mats), and mesh fences can sometimes evade detection.
- Expert Tip: When parking near such obstacles, slow down further than the sensor alerts and supplement with visual checks.
- Always Perform a Visual Check
- Why You Shouldn’t Rely Solely on Sensors: They’re invaluable aids, but they can’t see everything especially things outside their detection cone or under extreme angles.
- Expert Tip: Make a habit of briefly scanning mirrors and looking over your shoulder before trusting the sensors alone.
- Test After Installation and Cleaning
- How to Test: Use a familiar object (like a traffic cone or a cardboard box) at known distances. Listen and watch for the correct beeping cadence or display response.
- Expert Tip: A quick monthly test ensures your system is operating correctly and helps you stay calibrated to its alerts.
- Be Mindful of Tow Bars & Spare Wheels
- Why It Matters: These fixtures can trigger constant alerts if sensors are positioned too close.
- Expert Tip: If your vehicle has a rear-mounted spare or tow hitch, park next to a vertical object (like a pole) to gauge where the sensors falsely trigger, then adjust placement or sensitivity accordingly.
By combining these practical tips rooted in hands-on experience with your parking sensor system, you’ll maximize reliability, minimize surprises, and enjoy smoother, safer parking maneuvers every time.
Parking Sensors vs. Reverse Cameras
When it comes to aftermarket parking aids, drivers often weigh parking sensors against reverse cameras or opt for both. Each technology brings its own strengths and limitations. Here’s how they compare and why combining them can deliver the ultimate parking solution.
Parking Sensors
Pros:
- Audible Alerts: Provide clear, step-by-step beeps that translate distance into an intuitive audio cue.
- Low-Light Performance: Work equally well in darkness, fog, or glare—sound waves (or electromagnetic fields) aren’t affected by lighting.
- Detect Low Obstacles: Excellent at sensing curbs, wheel stops, and other ground-level hazards that cameras may not capture.
Cons:
- No Visual Overview: You hear proximity but don’t see exactly what’s there—objects outside the detection cone or under extreme angles may go unnoticed.
- Range Limitations: Typically effective up to 1.5–2 meters; beyond that, sensors may not register until you’re already very close.
- False Alerts: Weather, road debris, or sensor obstructions can trigger unwanted beeping.
Reverse Cameras
Pros:
- Wide Field of View: Offer a live video feed often with 120° or greater coverage so you can see obstacles to the sides as well as behind.
- Spot Small/High Objects: Ideal for detecting children, pets, or low-lying objects that may not reflect sensor waves well.
- Trajectory Guidance: Many systems overlay parking lines or turn-angle guides to help you steer precisely into a space.
Cons:
- Light-Dependent: Performance can suffer in very low light or high-contrast glare; may require supplemental illumination (e.g., LED reverse lights).
- Lens Obstruction: Dirt, rain, or snow on the camera lens can blur or block the view requiring frequent cleaning.
- No Exact Distance Alerts: While you see objects, estimating exact clearance (e.g., 20 cm vs. 50 cm) can still be a challenge without additional sensors.
Why Use Both?
- Redundancy for Safety: Sensors catch low or non-reflective hazards, while the camera shows you the full backing picture and side obstacles.
- Complementary Strengths: Audio cues give real-time distance warnings, and video provides context so you both “hear” and “see” what’s around you.
- Enhanced Confidence: The combined system minimizes blind spots, reduces false alarms, and delivers layered feedback perfect for crowded lots, tight garages, and nighttime parking.
Expert Tip: If budget allows, invest in a hybrid setup that syncs sensor beeps with your camera’s display many head-unit and aftermarket systems seamlessly integrate both feeds for a single, cohesive interface.
Real-World Scenario Spotlights
Scenario 1: Parallel Parking on a Busy Street
You’re on a narrow downtown avenue, flanked by double-parked cars and a tight curb. As you inch backward into a parallel spot, your rear parking sensors emit a slow beep indicating you’re about one meter from the car behind. The beeps speed up when you’re just 50 cm away, and a continuous tone lets you know you’ve reached the perfect stopping point no scraped bumper, no honking from frustrated drivers.
Scenario 2: Squeezing into a Tight Garage
It’s winter, and you need to park your SUV in the family’s cramped one-car garage, where boxes and tools line the sidewalls. Engaging reverse, your front and rear sensors activate. As you back in, the front sensors warn you of a shelving unit just three feet ahead, while the rear sensors alert you to a stack of storage bins on the opposite side. You stop precisely, avoiding both obstacles without ever risking a ding.
Scenario 3: Detecting an Unseen Obstacle
After a day at the playground, you pull into your driveway and prepare to back out. Your rear sensors suddenly emit a rapid series of beeps faster than usual. A quick glance at your LED display shows an object just half a meter behind you. It’s your toddler’s plastic toy wagon, hidden from view until now. Thanks to your sensors, you pause in time and prevent a potential accident.
These spotlights illustrate how parking sensors transform everyday parking challenges parallel spaces, tight garages, and hidden hazards into safe, stress-free experiences.
Troubleshooting Common Issues
Even the best parking sensor systems can run into hiccups. Here’s how to diagnose and fix three of the most frequent problems:
1. False Alarms
Potential Causes:
- Dirt, Mud, or Ice Buildup: Debris on the sensor face can bounce back errant signals.
- Heavy Rain or Splashback: Water droplets can register as obstacles, especially with ultrasonic systems.
- Nearby Metal Objects: Parked trailers, wheel stops, or fencing can sometimes sit just inside an electromagnetic field’s perimeter.
Solutions:
- Clean Regularly: Wipe each sensor with a soft cloth after driving in messy conditions.
- Adjust Sensitivity: If your kit allows it, dial back sensitivity to ignore minor disturbances.
- Reposition Sensors: For electromagnetic units, slightly shift the mounting location to narrow the detection zone away from fixed metal objects.
2. Sensors Not Detecting Anything
Potential Causes:
- Obstructed Sensors: Dirt, snow, or aftermarket bumper accessories may be blocking the sensor’s “line of sight.”
- Wiring Faults: A loose connector or damaged cable can prevent signals from reaching the control module.
- Power Issues: A blown fuse or incorrect power tap can cut the system dead.
Solutions:
- Perform a Visual Inspection: Clear away any debris and ensure each sensor sits flush against the bumper.
- Check Connections: Trace wiring back to the control unit, reseating any plugs and looking for damaged insulation.
- Verify Power Supply: Using a multimeter, confirm the module is receiving the correct voltage (usually 12V from the reverse-light circuit).
3. Inaccurate or Inconsistent Readings
Potential Causes:
- Misaligned Sensors: If mounted too high, low, or at the wrong angle, the detection cone can be skewed.
- Calibration Drift: Some systems require occasional re-calibration after rough drives or panel work.
- Bumper Flex: On certain vehicles, bumper flexing under load can slightly move sensors out of alignment.
Solutions:
- Re-level the Sensors: Park on a flat surface and adjust sensor height until they’re perpendicular to the ground.
- Run a Calibration Routine: Consult your manual many kits include a button-press sequence to reset detection thresholds.
- Reinforce Mounting: Use additional clips or support brackets if bumper movement is shifting sensor position.
By following these troubleshooting steps rooted in hands-on experience you can resolve most parking sensor headaches swiftly and get back to smooth, confident parking.
Conclusion
By installing a quality parking sensor system whether you opt for rear parking sensors, a full front-and-rear setup, or an OEM-style solution you’ll transform every parking maneuver into a stress-free task. You’ll enjoy real-time distance alerts that shrink your blind spots, protect your bumpers from costly dents and scrapes, and give you the confidence to park anywhere, any time.
Use the checklists and buying guide in this article to parking sensors to evaluate configurations (front, rear, or both), sensor count, display styles, and installation options that best suit your vehicle and driving habits. Armed with this knowledge, you’ll be able to select and install the ideal system DIY or professional while avoiding common pitfalls.
Now, it’s your turn to take action: pick the right parking sensor kit, run through the buyer’s checklist, and start enjoying smoother, safer parking today. With parking anxiety a thing of the past, you’ll wonder how you ever managed without this indispensable driving aid.